On this page

Introduction

Applicants are required to provide a proof-of-identity document when applying for grant programs with the Department of Jobs, Skills, Industry and Regions. The department uses the Document Verification Service (DVS) to verify each document with its issuing agency.

Please refer to the guidelines of individual programs to check which documents are available for verification. Please note that not all documents are available for identity verification in every program.

When providing a proof of identity with your application, please make sure to:

  • include correct identification numbers
  • type your name as it appears on the card or document
  • enter dates correctly
  • avoid errors such as double spaces or incorrect punctuation.

Please check your answers before submitting your details. An error may affect your proof of identity verification result.

If you receive fail or error messages when submitting your proof of identity check, your details are likely to be incorrectly entered. Check and correct your details before re-submitting.

If you need further assistance, call Business Victoria on 13 22 15 or email info@business.vic.gov.au.

Driver licence or learner permit

Image shows a Victorian Driver Licence with red boxes highlighting the Given Name, Family Name, Licence Number and Date of Birth fields.

Figure 1a – Driver Licence – Victoria

Licence or permit number

Enter the licence number as it appears on your card. The number of digits or characters varies from state to state. In Victoria, a driver licence usually contains nine digits.

Do NOT include spaces.

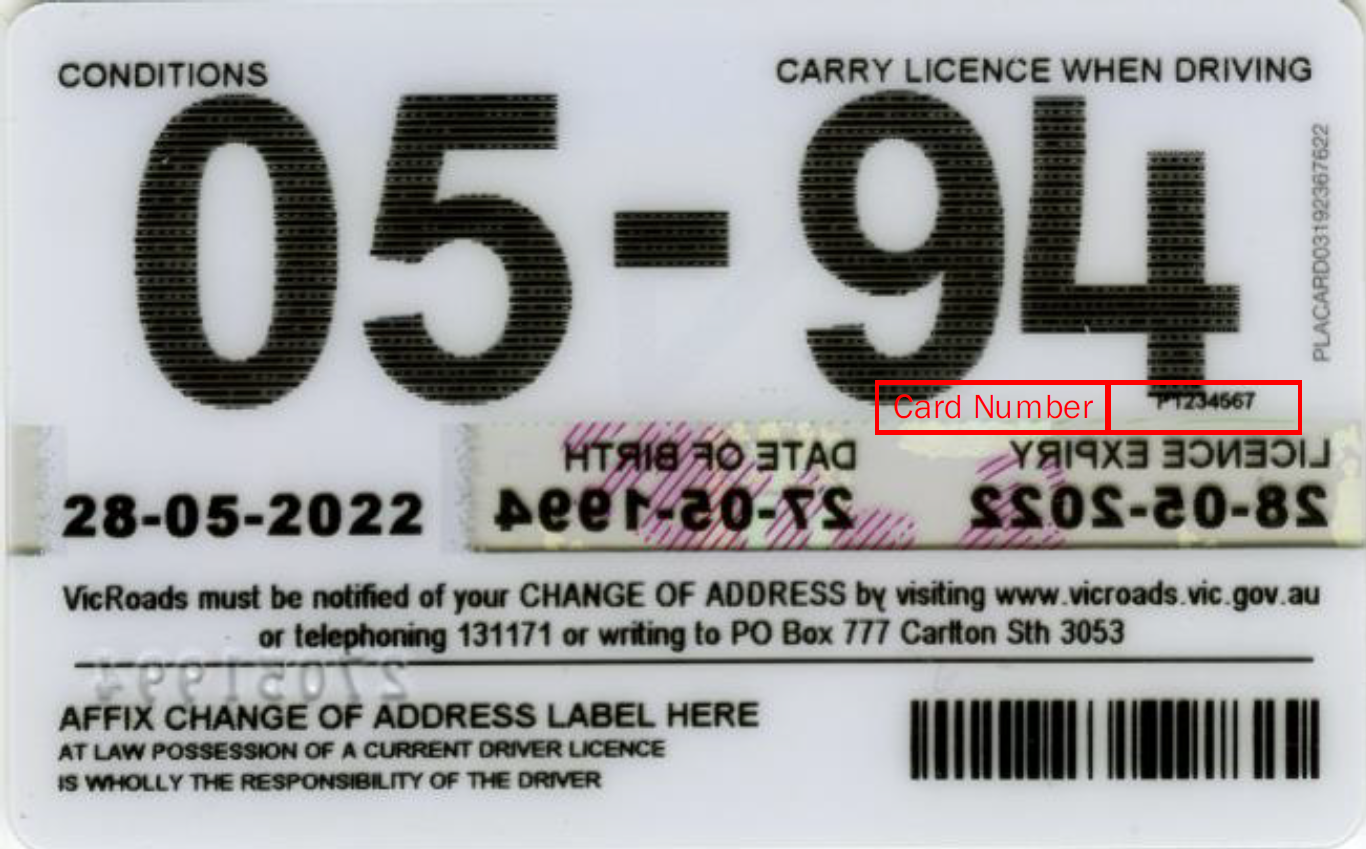
Card number (Victoria)

Your 8-character card number can be found in large font in the top right corner of the back of your card (Figure 1b) OR in small font on the right side of the back of your card (Figure 1c).

If you are having trouble reading the small font:

  • You can access your unique card number in your myVicRoads account.
  • You may input your Licence number instead (only if you have not been affected by the September 2022 Optus data breach).

Image shows the back of a Victorian Driver Licence with a red box highlighting the Card Number field in the top right corner of the card.

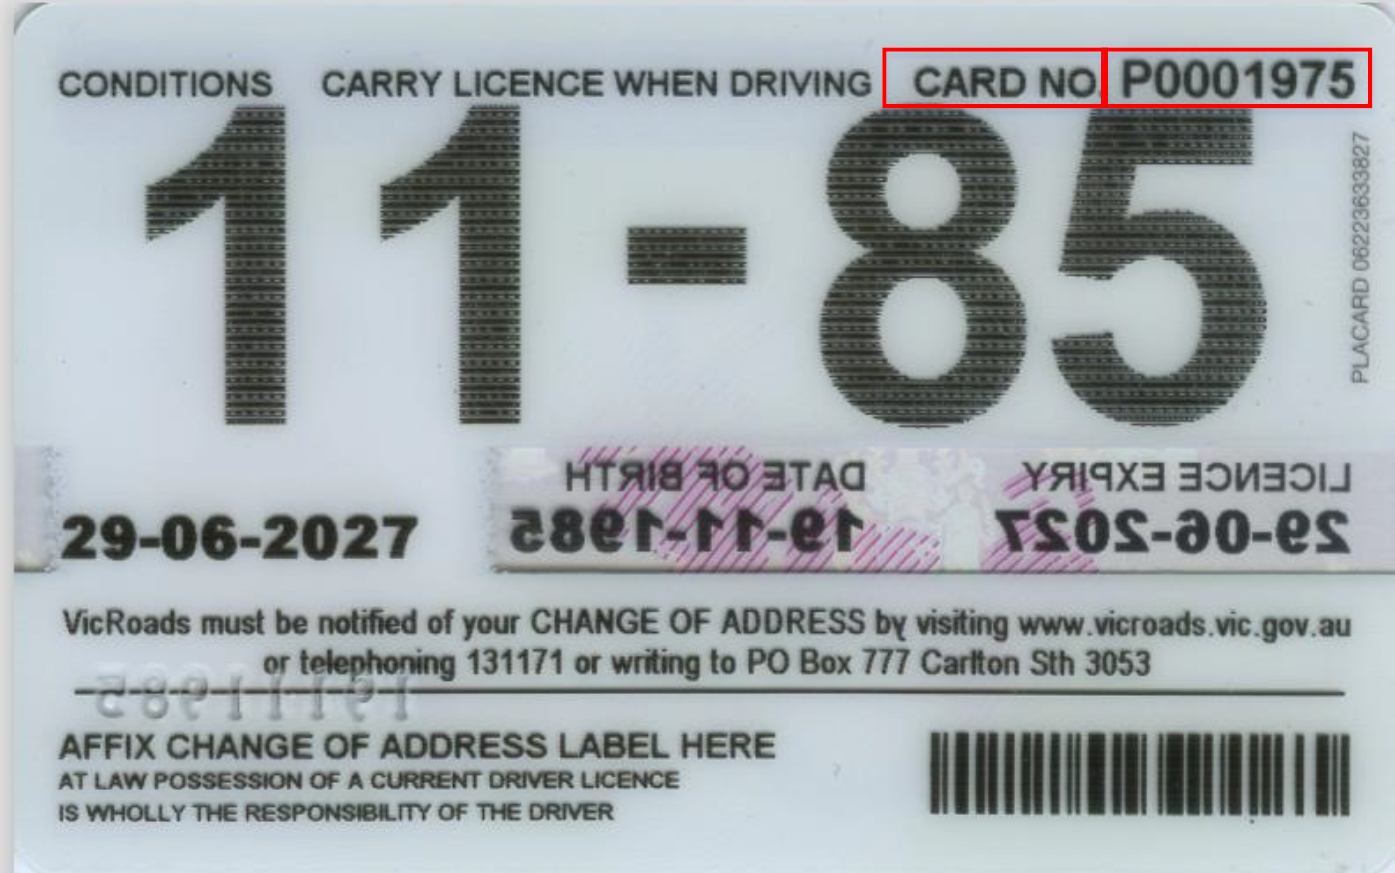
Figure 1b – Driver Licence (back) – Victoria – Card number in large font

Image shows the back of a Victorian Driver Licence with a red box highlighting the Card Number field on the right side of the card

Figure 1c – Driver Licence (back) – Victoria – Card number in small font

State of Issue

You may use a driver licence or learner permit from any Australian state or territory.

Name

Enter your given name and family name as they appear on the licence or permit. Do NOT include your middle name or initials.

Include hyphens, apostrophes, full stops, and spaces, as shown on the licence or permit.

Date of birth

Make sure you enter the date as it appears on your document (DD/MM/YYYY). Make sure your date of birth does not include the current year.

Medicare card

Image shows an Australian Medicare Card with red boxes highlighting the Name, Medicare number, Individual Reference Number and Expiry Date fields.

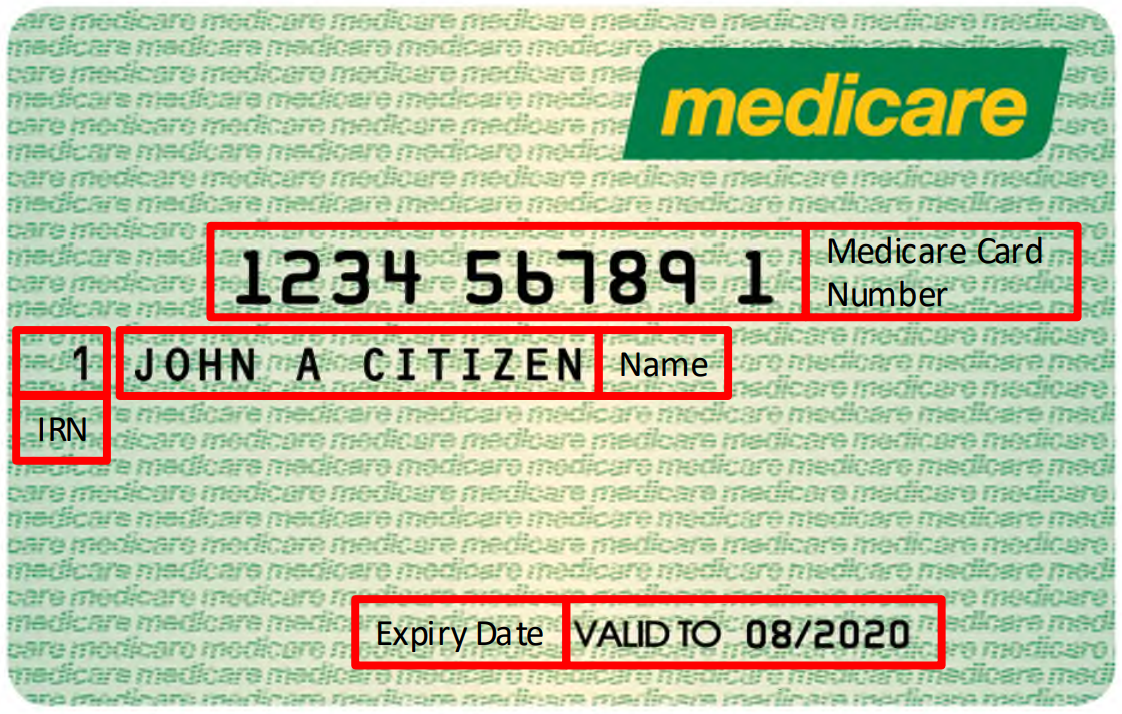
Figure 2 – Australian Medicare Card – Green

Image shows an Australian Medicare Card with an example of a long name and red boxes highlighting the Name, Medicare number, Individual Reference Number and Expiry Date fields.

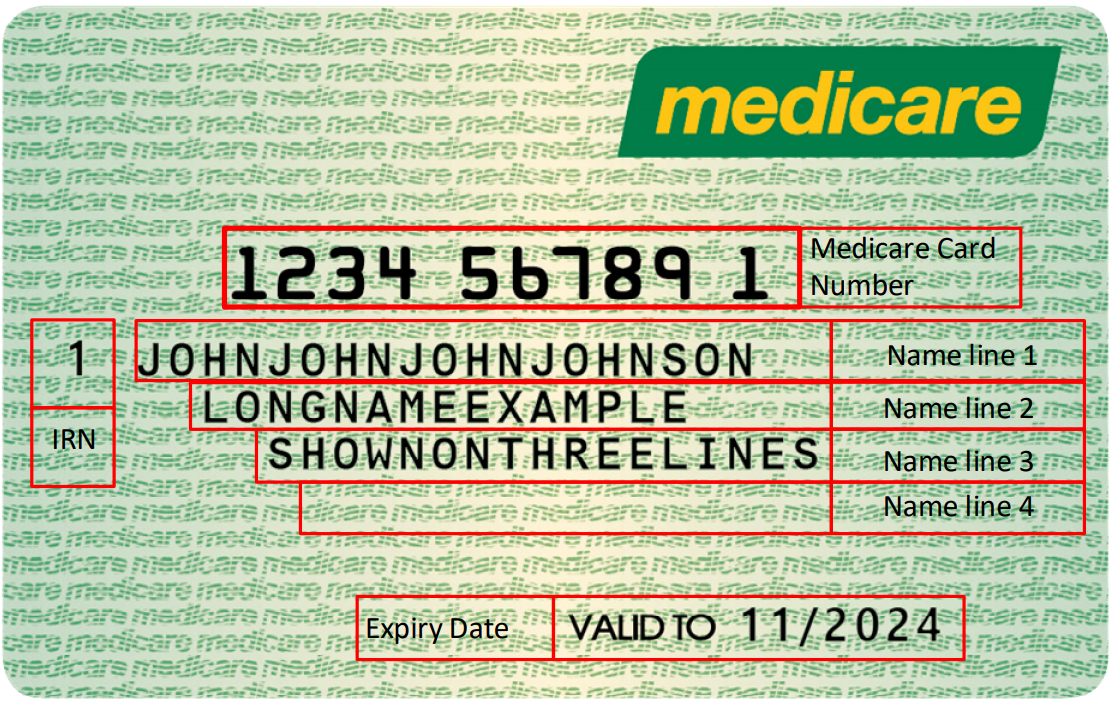
Figure 3 – Australian Medicare Card – Green (long name)

Medicare card number

Enter all 10 digits on your Medicare card. Do NOT include spaces.

Name

Enter your name as it appears on your Medicare card, including any punctuation and middle initials.

Do NOT include the names of others listed on your Medicare card.

When prompted, indicate whether your name appears across one or more lines on your card. See Figures 4 & 5 below on how to correctly enter your Medicare card details, using the sample cards above as an example.

- Image shows name fields in an online application form. The instruction for the first field reads, “* Does your name appear across more than one line of the card?”. The drop-down list to its right has “No” selected. The instruction next to the second field reads, “* Full name as it appears on your Medicare card (including initial where applicable)”. The text entry field to its right shows the example text “JOHN A CITIZEN”

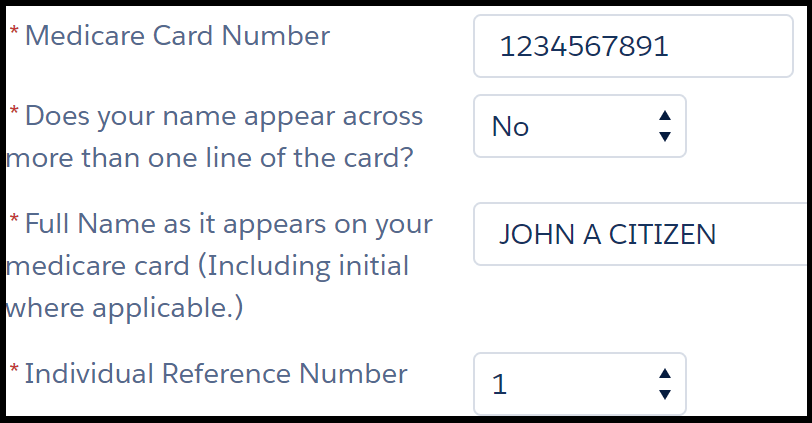
Figure 4 – Medicare Card – If your name appears on one line on your Medicare card, answer ‘NO’ to the question ‘Does your name appear across more than one line of the card?’. Then, enter your full name as it appears on your Medicare card.

Image shows name fields in an online application form. The instruction next to the first field reads, “*Does your name appear across more than one line of the card?”. The drop-down list to its right has “Yes” selected. The following name fields are inputted with a long name, with each field corresponding to a line on the Medicare Card.

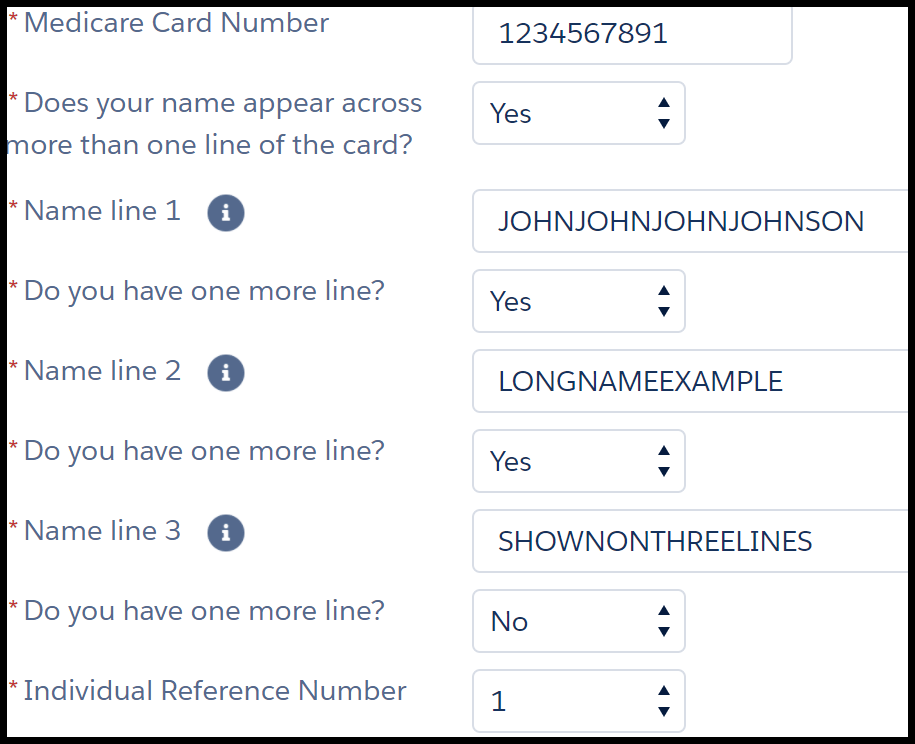
Figure 5 – Medicare Card (long name) – If your name appears across more than one line on your Medicare Card, answer ‘YES’ to the question ‘Does your name appear across more than one line of the card?’. Then, enter your name as it appears on each line.

Individual Reference Number (IRN)

Select the number that appears on the left-hand side of your name.

Date of birth

Even though your date of birth is not printed on your Medicare card, it will be required to be entered for verification. Make sure your date of birth does not include the current year and is entered in the correct format (DD/MM/YYYY).

Expiry date

Make sure you enter the expiry date as it appears on your card.
Note the colour of your card will mean a different expiry date format must be entered.

  • Green Medicare card: MM/YYYY
  • Blue or yellow Medicare card: DD/MM/YYYY

Australian passport

Image shows an Australian passport with red boxes highlighting passport number, Family Name, given name, date of birth, gender and expiry date

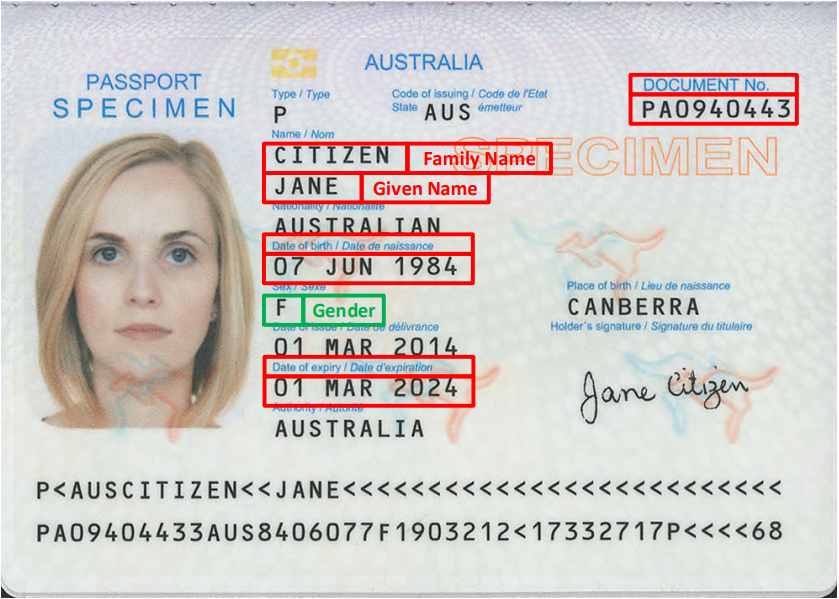
Figure 6 – Australian passport

Document number

Please enter the number as it appears on your document. Enter the one or two alphabetical letters followed by seven digits. Do NOT include spaces.

Name

Enter your name as it appears on the identification page. Include middle name/s or initials in the ‘given name’ field (see Figures 7 and 8 below). Include hyphens, apostrophes, and spaces, if applicable.

Image shows two fields in an online form. The instruction next to the first field reads, “* given name s (including middle names or initials – exactly as printed on your passport)”. The text entry to the right shows example “john a”. Instruction for second field reads, “* family name (exactly as printed on your passport)”. The text entry to the right shows example “citizen”. Asterisks next to instructions are red and indicate a mandatory field.

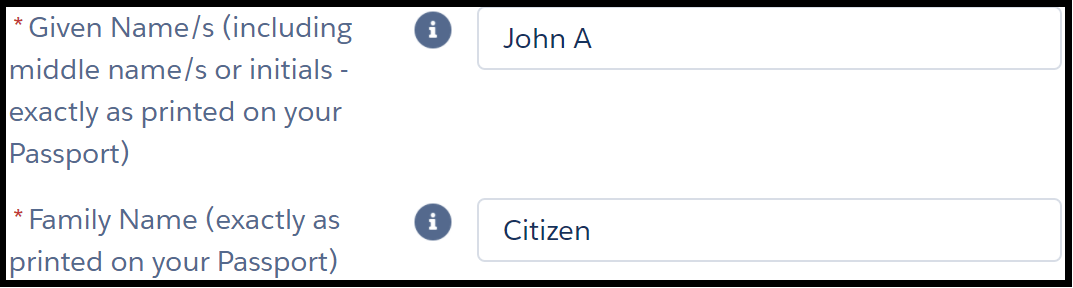
Figure 7 – How to enter your middle initial for Australian passport and Australian visa.

Image shows two fields in an online form. The instruction next to the first field reads, “* given name s (including middle names or initials – exactly as printed on your passport)”. The text entry to the right shows example “john adam”. Instruction for second field reads, “* family name (exactly as printed on your passport)”. The text entry to the right shows example “citizen”. Asterisks next to instructions are red and indicate a mandatory field.

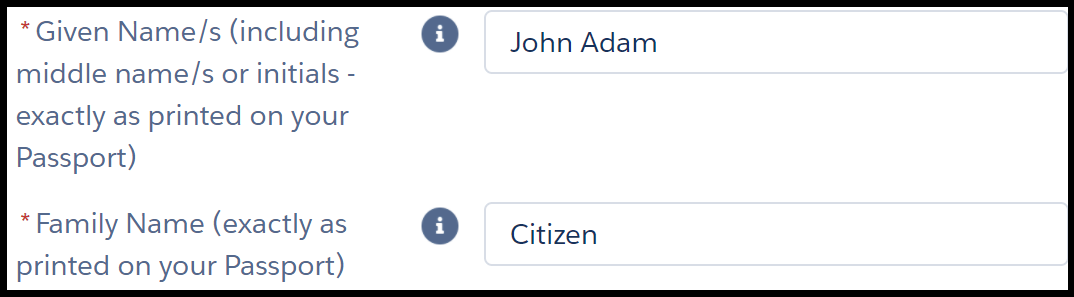
Figure 8 – How to enter your middle name for Australian passport and Australian visa.


Date of birth

Make sure you enter the date as it appears on your document (DD/MM/YYYY), and make sure your date of birth does not include the current year.

Gender

Please note that for Australian Passports, ‘Gender’ is an optional field. If you do choose to provide your gender, it must match what appears on the document.

Australian Visa (international passport)

Image shows a Chinese passport with red boxes highlighting passport number, Family Name, given name and date of birth.

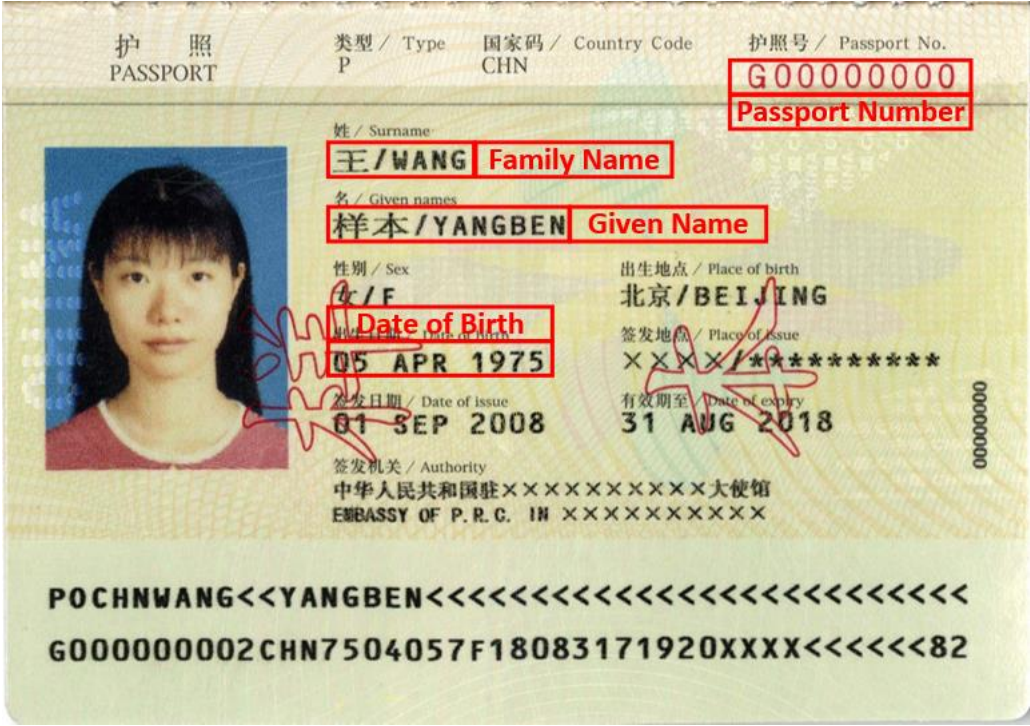
Figure 9 – Chinese passport sample

- Image shows a United Kingdom passport with red boxes highlighting passport number, Family Name, given name and date of birth.

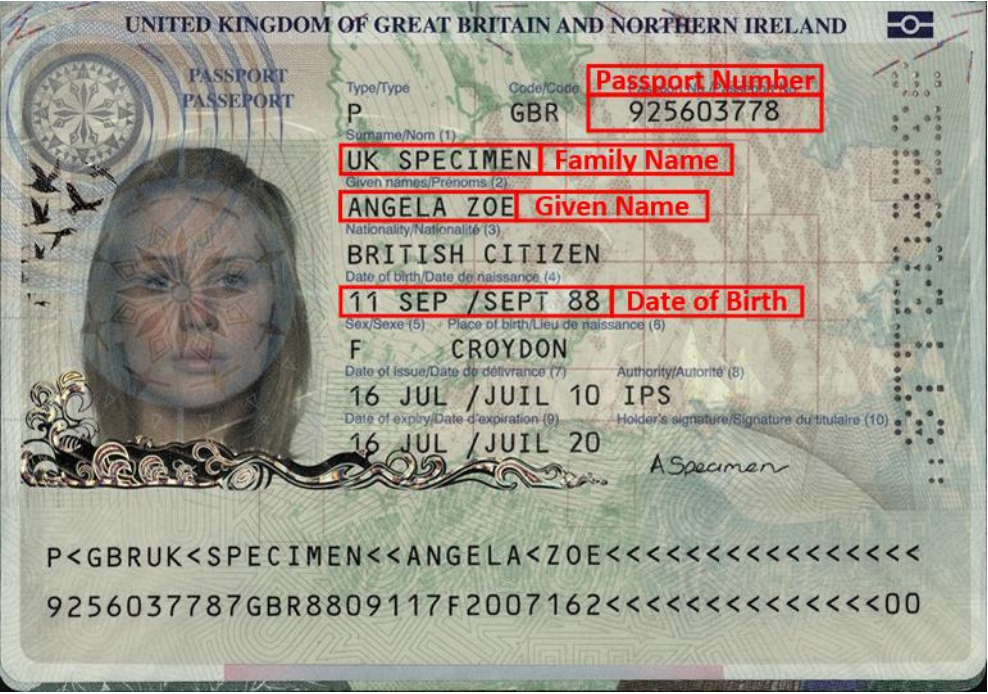
Figure 10 – United Kingdom passport sample

- Image shows a Visa grant notice with red boxes highlighting given name, family name, date of birth, visa number, passport number and nationality.

Figure 11 – Visa grant notice

Document number

Enter all 13 digits of your visa grant number.

For New Zealand Passport Holders Only: There are special rules that allow New Zealanders to enter Australia without applying for a Visa. If you are using a New Zealand passport to verify your identity and you do not know your Visa number, please enter the number zero (0) thirteen times (i.e. 0000000000000).

Enter the passport number as it appears on your international passport.

Do NOT include spaces.

Name

Enter your name as it appears on the identification page. Include middle name/s or initials in the ‘given name’ field (see Figures 12 and 13 below). Include hyphens, apostrophes, and spaces, if applicable.

- Image shows two fields in an online form. The instruction next to the first field reads, “* given name s (including middle names or initials – exactly as printed on your passport)”. The text entry to the right shows example “john a”. Instruction for second field reads, “* family name (exactly as printed on your passport)”. The text entry to the right shows example “citizen”. Asterisks next to instructions are red and indicate a mandatory field.

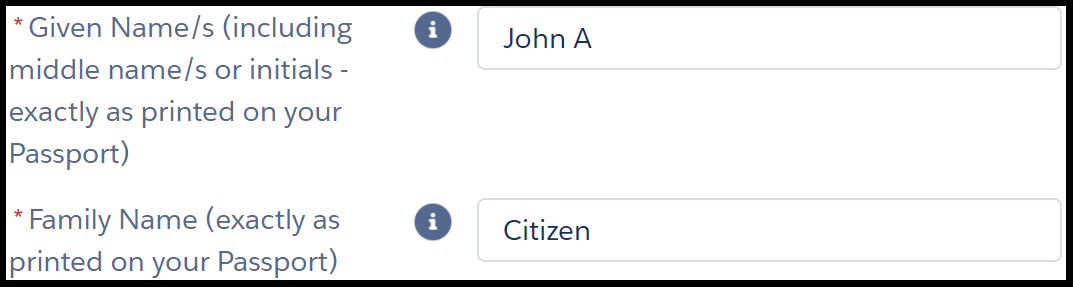
Figure 12 – How to enter your middle initial for Australian visa (international passport)

Image shows two fields in an online form. The instruction next to the first field reads, “* given name s (including middle names or initials – exactly as printed on your passport)”. The text entry to the right shows example “john adam”. Instruction for second field reads, “* family name (exactly as printed on your passport)”. The text entry to the right shows example “citizen”. Asterisks next to instructions are red and indicate a mandatory field.

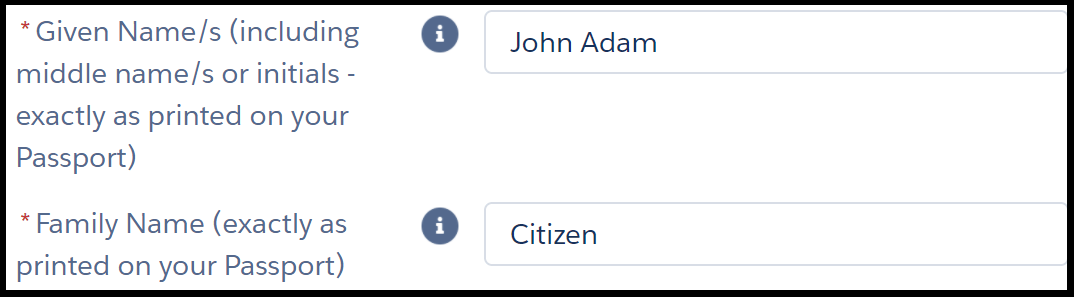
Figure 13 – How to enter your middle name for Australian visa (international passport)

Characters with accents need to be converted to standard English characters. For example:

  • é must be entered as e
  • á must be entered as a

If you are unsure, use the character conversion table.

Date of birth

Make sure you enter the date as it appears on your document (DD/MM/YYYY). Make sure your date of birth does not include the current year.

Special naming conventions

Apostrophes

If your name has an apostrophe, use the standard apostrophe symbol (‘) and not the backtick or open quote character (`) (see Figure 14).
Do not copy and paste your name from another document. It may not contain the standard apostrophe symbol.

- Image shows one field in an online form. The instruction next to the field reads, “* Family Name”. The text entry field shows the example name “O’Brien”. A backtick has been used instead of a standard apostrophe. A red error message reads, “Please match the requested format: Enter Family Name as it appears on your Drivers Licence”.

Figure 14 – A backtick character (`) will produce an error message. Use the standard apostrophe (‘)

Names with Mc- or Mac-

If your name contains the prefix Mc- or Mac-, your name may be registered with a space between the prefix and the rest of the name. For example, your name could be registered as either McDonald or Mc Donald.

Please try both combinations (Figures 15 and 16).

Image shows one field in an online form. The instruction next to the field reads, “* Family Name”. The text entry field shows the example name “McDonald”.

Figure 15 – Combination A – Enter your name without a space between the prefix and the rest of the name.

- Image shows one field in an online form. The instruction next to the field reads, “* Family Name”. The text entry field shows the example name “Mc Donald”. There is a space after the prefix “Mc”.

Figure 16 – Combination B – Enter your name with a space between the prefix and the rest of the name

Names that appear in the identity document on one line only

In some cases, your full name may be registered as a ‘family name’ only or a ‘given name’ only. Therefore, your name may be printed in only one field in your identity document. This is common for names ending with ‘Singh’ or ‘Kaur’ and for individuals with a single name only.

Please follow the advice for each type of document below.

Driver licence or permit

  • For names ending with Singh or Kaur, try the following combinations before seeking further assistance (Figures 17 & 18).

Image shows two fields in an online form. The instruction next to the first field reads, “* given name (do not include middle name or initial)”. The text entry field to its right shows example “Amandeep”. Instruction for second field reads, “* family name”. The text entry field to its right shows example “Singh”. Asterisks next to instructions are red and indicate a mandatory field.

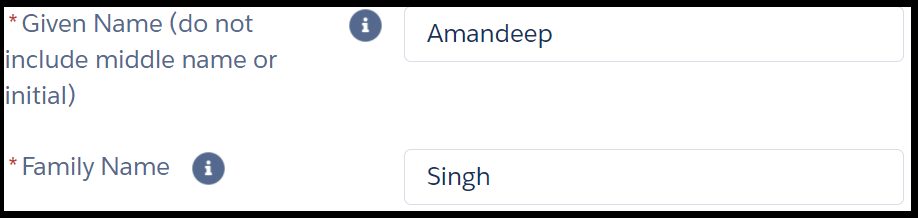
Figure 17 – Combination A – Split your name between the Given Name and Family Name fields

- Image shows two fields in an online form. The instruction next to the first field reads, “* given name (do not include middle name or initial)”. The text entry field to its right has a hyphen inputted. Instruction for second field reads, “* family name”. The text entry field to its right shows example “Amandeep Singh”. Asterisks next to instructions are red and indicate a mandatory field.

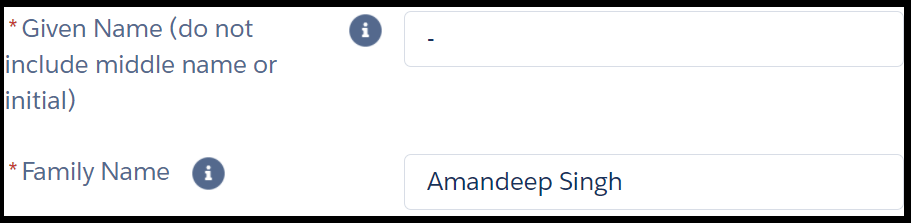
Figure 18 – Combination B – Enter a hyphen in Given Name field. Enter your name as it is printed on the document in the Family Name field.

  • For single names, enter a hyphen in Given Name field. Enter your name as it is printed on the document in the Family Name field (Figure 19).

Image shows two fields in an online form. The instruction next to the first field reads, “* given name (do not include middle name or initial)”. The text entry field to its right has a hyphen inputted. Instruction for second field reads, “* family name”. The text entry field to its right shows example “Citizen”. Asterisks next to instructions are red and indicate a mandatory field.

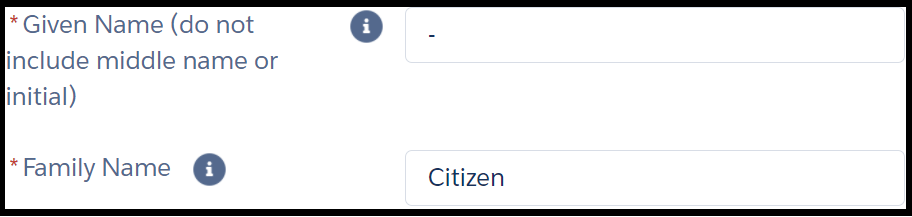
Figure 19 – Hyphen entered in Given Name field. Name as printed in document entered in Family Name field.


Medicare card

Enter your name as it appears on the card.

Image shows one field in an online form. The instruction next to the field reads, “* full name as it appears on your medicare card (including initial where applicable). The text entry field to its right shows example “Amandeep Singh”.

Figure 20 – Full name on Medicare Card

Image shows one field in an online form. The instruction next to the field reads, “* full name as it appears on your medicare card (including initial where applicable). The text entry field to its right shows example “Citizen”.

Figure 21 – Single Name on Medicare Card

Australian passport

  • For names ending with Singh or Kaur, try the following combinations before seeking further assistance (Figures 22 & 23).

Image shows two fields in an online form. The instruction next to the first field reads, “* given name s (including middle name s or initials – exactly as printed on your Australian Passport)”. The text entry field to its right shows example “Amandeep”. Instruction for second field reads, “* family name”. The text entry field to its right shows example “Singh”. Asterisks next to instructions are red and indicate a mandatory field.

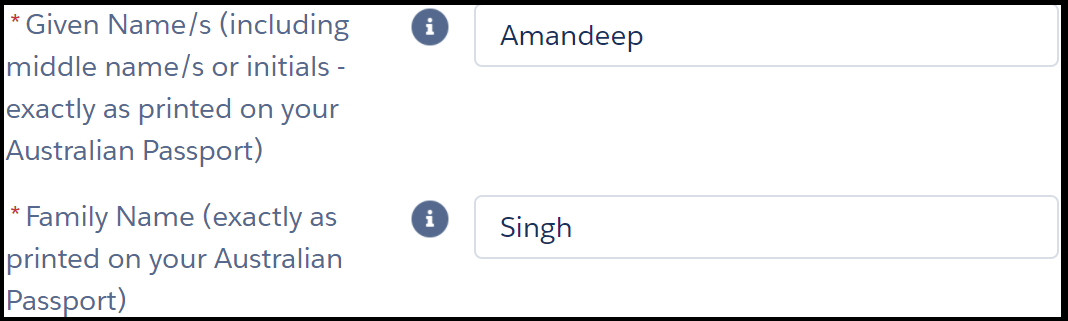
Figure 22 – Combination A – Split your name between the Given Name and Family Name fields

 Image shows two fields in an online form. The instruction next to the first field reads, “* given name s (including middle name s or initials – exactly as printed on your Australian Passport)”. The text entry field to its right is blank. Instruction for second field reads, “* family name”. The text entry field to its right shows example “Amandeep Singh”. Asterisks next to instructions are red and indicate a mandatory field.

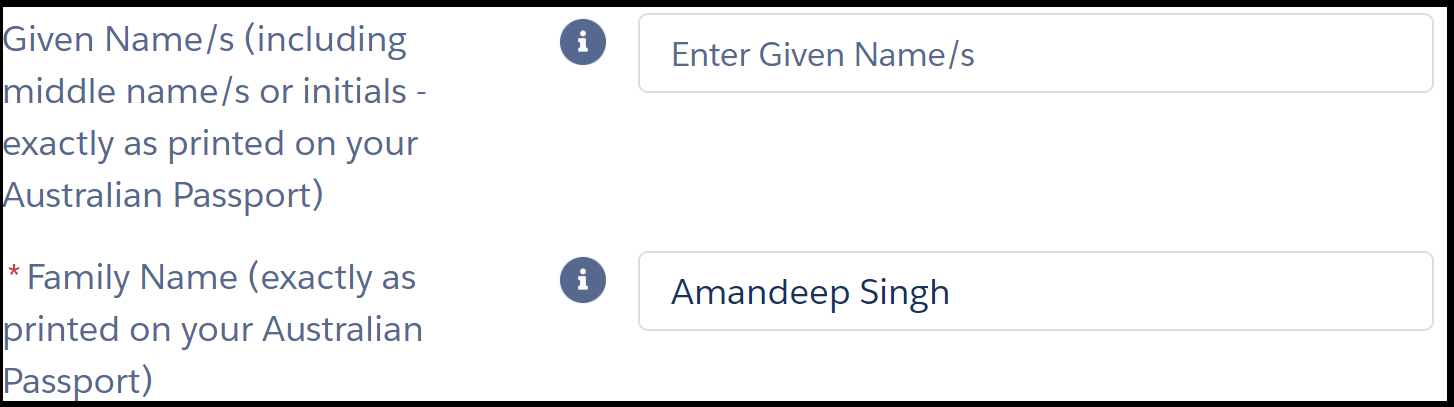
Figure 23 – Combination B – Leave the Given Name field blank. Enter your name as it is printed on the document in the Family Name field.

  • For single names, enter your name in the Family Name field. Leave the Given Name field blank (Figure 24).

Image shows two fields in an online form. The instruction next to the first field reads, “* given name s (including middle name s or initials – exactly as printed on your Australian Passport)”. The text entry field to its right is blank. Instruction for second field reads, “* family name”. The text entry field to its right shows example “Citizen”. Asterisks next to instructions are red and indicate a mandatory field.

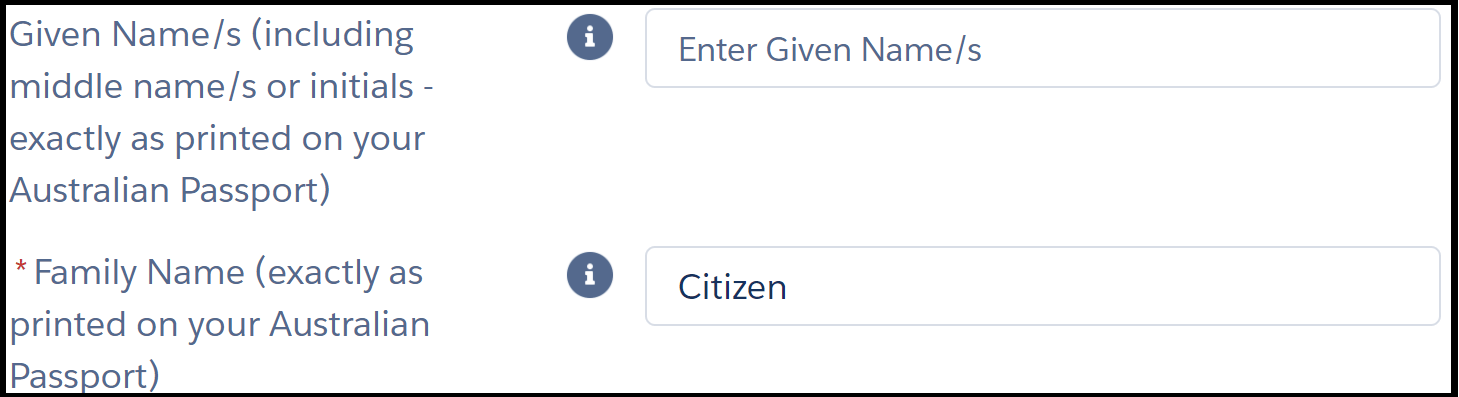
Figure 24 – Leave Given Name field blank. Enter your name in the Family Name field.

Australian visa

  • For names ending with Singh or Kaur, try the following combinations before seeking further assistance (Figures 25 & 26).

Image shows two fields in an online form. The instruction next to the first field reads, “* given name s (including middle name s or initials – exactly as printed on your Passport)”. The text entry field to its right shows example “Amandeep”. Instruction for second field reads, “* family name”. The text entry field to its right shows example “Singh”. Asterisks next to instructions are red and indicate a mandatory field.

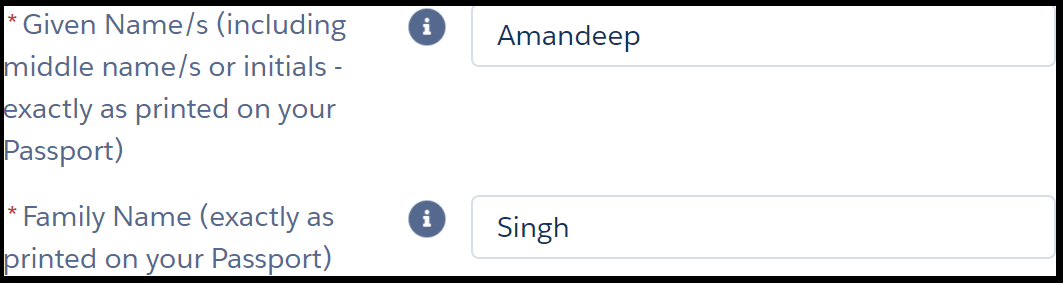
Figure 25 – Combination A – Split your name between the Given Name and Family Name fields.

Image shows two fields in an online form. The instruction next to the first field reads, “* given name (including middle name s or initials – exactly as printed on your Passport)”. The text entry field to its right has a hyphen inputted. Instruction for second field reads, “* family name”. The text entry field to its right shows example “Amandeep Singh”. Asterisks next to instructions are red and indicate a mandatory field.

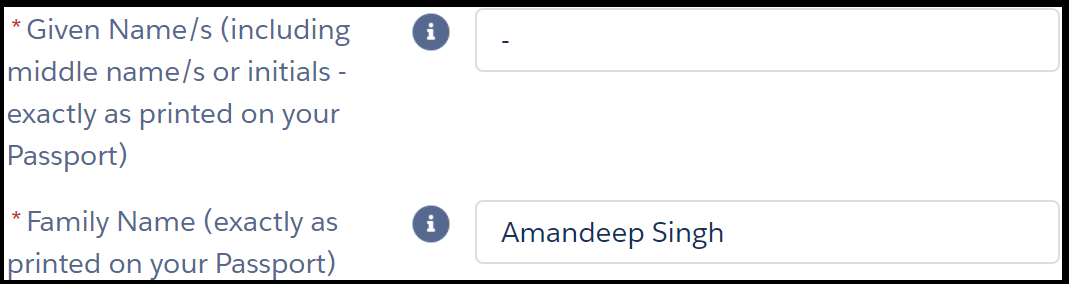
Figure 26 – Combination B – Enter a hyphen in Given Name field. Enter your name as it is printed on the document in the Family Name field.

  • For single names, enter your name in the Family Name field. Enter a hyphen in the Given Name field (Figure 27).

- Image shows two fields in an online form. The instruction next to the first field reads, “* given name (including middle name s or initials – exactly as printed on your Passport)”. The text entry field to its right has a hyphen inputted. Instruction for second field reads, “* family name”. The text entry field to its right shows example “Citizen”. Asterisks next to instructions are red and indicate a mandatory field.

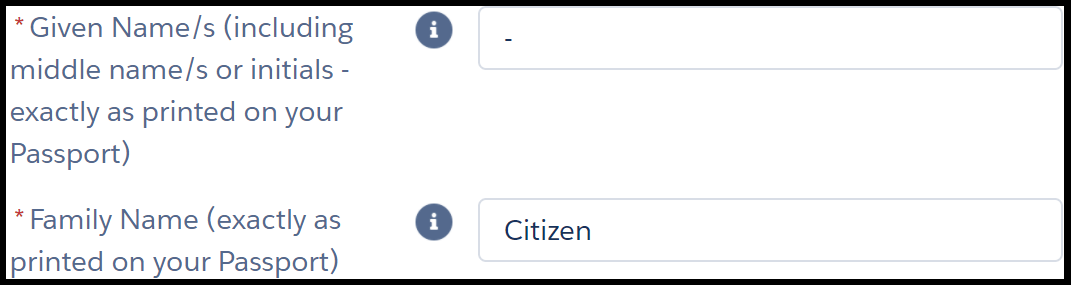
Figure 27 – Enter a hyphen in the Given Name field. Enter your name in the Family Name field.

DO NOT enter the same part of your name into both fields (Figures 28 & 29).

- Image shows two fields in an online form. The instruction next to the first field reads, “* given name (do not include middle name or initial)”. The text entry field to its right shows example “Amandeep Singh”. Instruction for second field reads, “* family name”. The text entry field to its right shows example “Singh”. There is a red “no allowed” symbol next image indicating that fields have been filled out incorrectly.

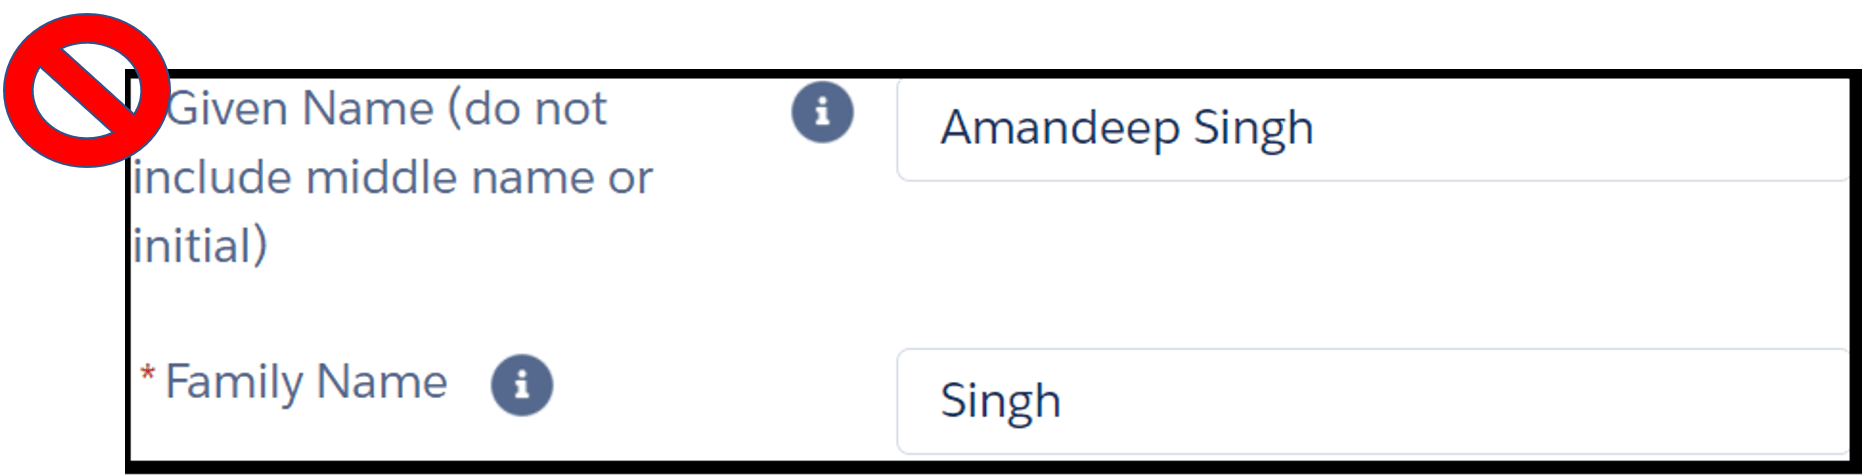
Figure 28 – Do not enter part of your name in both Given and Family Name fields.

Image shows two fields in an online form. The instruction next to the first field reads, “* given name (do not include middle name or initial)”. The text entry field to its right shows example “Amandeep Singh”. Instruction for second field reads, “* family name”. The text entry field to its right shows example “Amandeep Singh”. There is a red “no allowed” symbol next image indicating that fields have been filled out incorrectly.

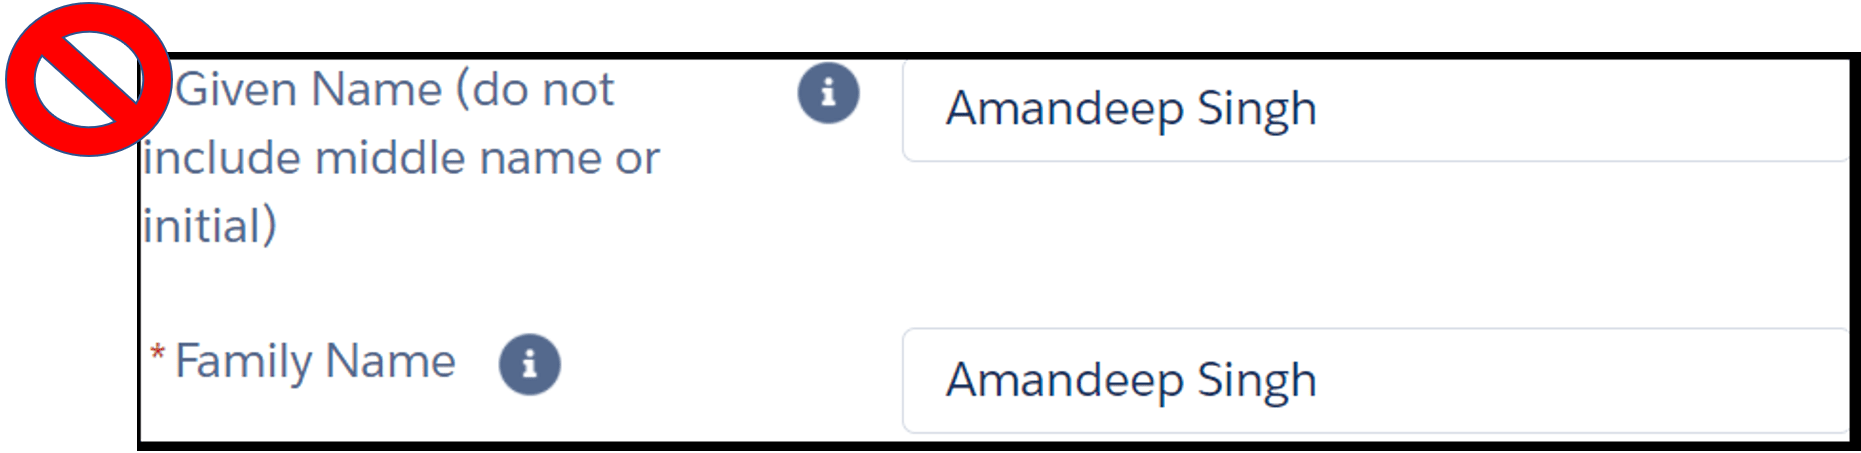
Figure 29 – Do not enter your entire name into both Given and Family Name fields.

How to update your proof of identity if your verification result was unsuccessful

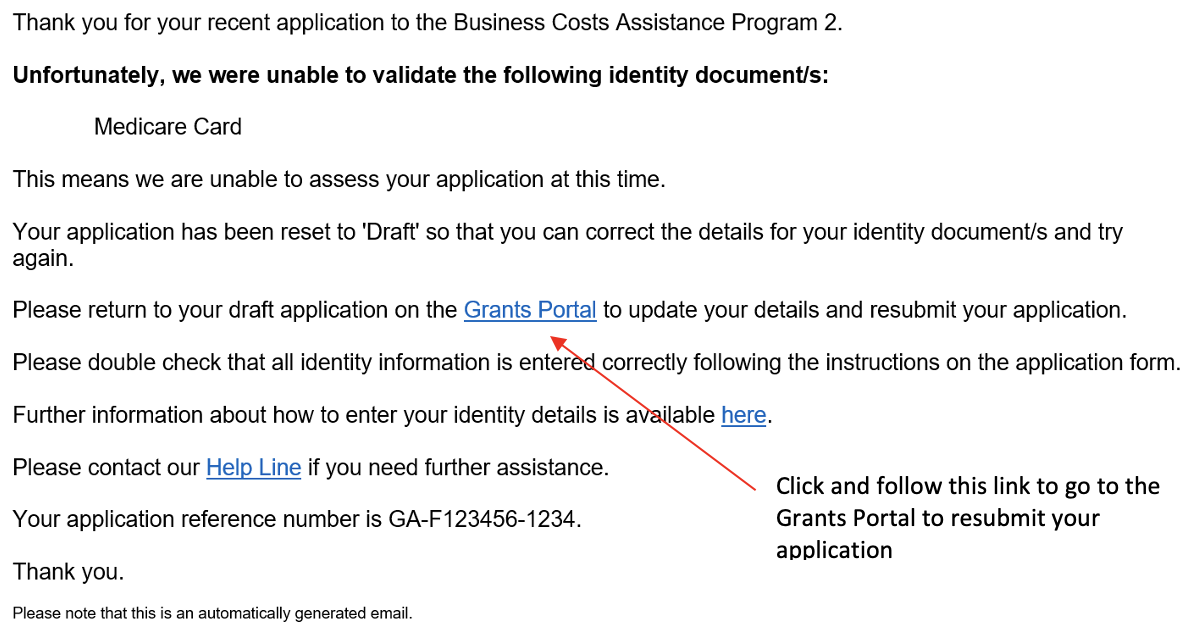
If your identity document check could not be verified, you will receive an email. Follow the step-by-step guide below to update and correct your details so your application can be processed.

Step One: Receiving email notification to update your details

Click and follow the ‘Grants Portal’ link to go to the Grants Portal and resubmit your application.

Image shows the copy from email notification asking applicants to update their details. A red arrow points to a hyperlinked section of text that reads 'Grants Portal'. The text accompanying the red arrow reads, “Click and follow this link to go to the Grants Portal to resubmit your application”.

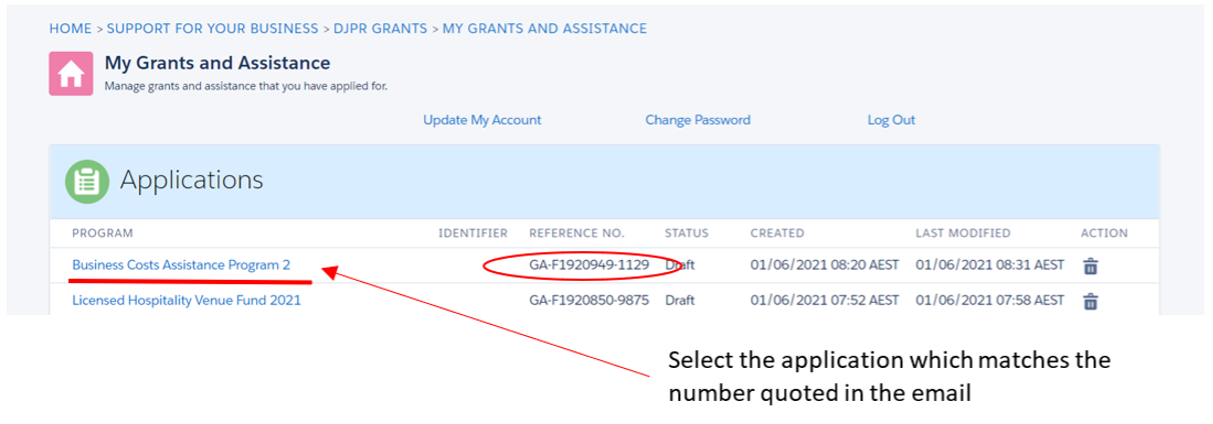
Step Two: Selecting your application on the Grants Portal

Select the application which matches the number quoted in the email.

Image shows the grants portal dashboard. A red arrow points to an application link that reads “Business Costs Assistance Program 2”. The text accompanying the red arrow reads, “Select the application which matches the number quoted in the email”. There is a red circle around the application’s corresponding reference number.

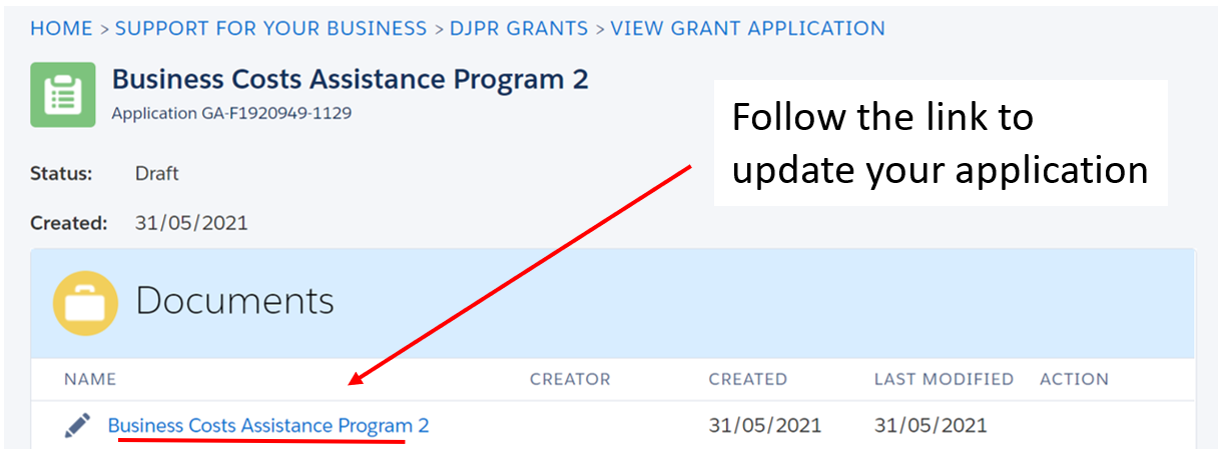
Step Three: Follow the link through to your application

Image shows the grants portal dashboard. A red arrow points to an application link that reads “Business Costs Assistance Program 2”. The text accompanying the red arrow reads, “Follow the link to update your application”.

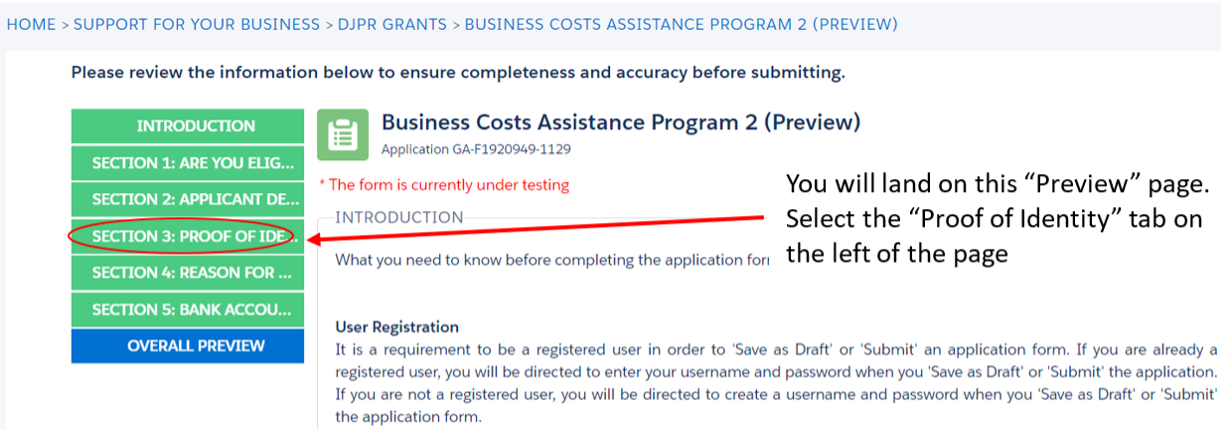
Step Four: Preview Page

On the Preview page, select the ‘Proof of Identity’ tab on the left of the page.

Image shows the Preview page from the application form. A red arrow points to a tab on the left of the page that is circled in red that reads, “Proof of Identity”. The text accompanying the red arrow reads, “You will land on the “Preview” page. Select the “Proof of Identity” tab on the left of the page”.

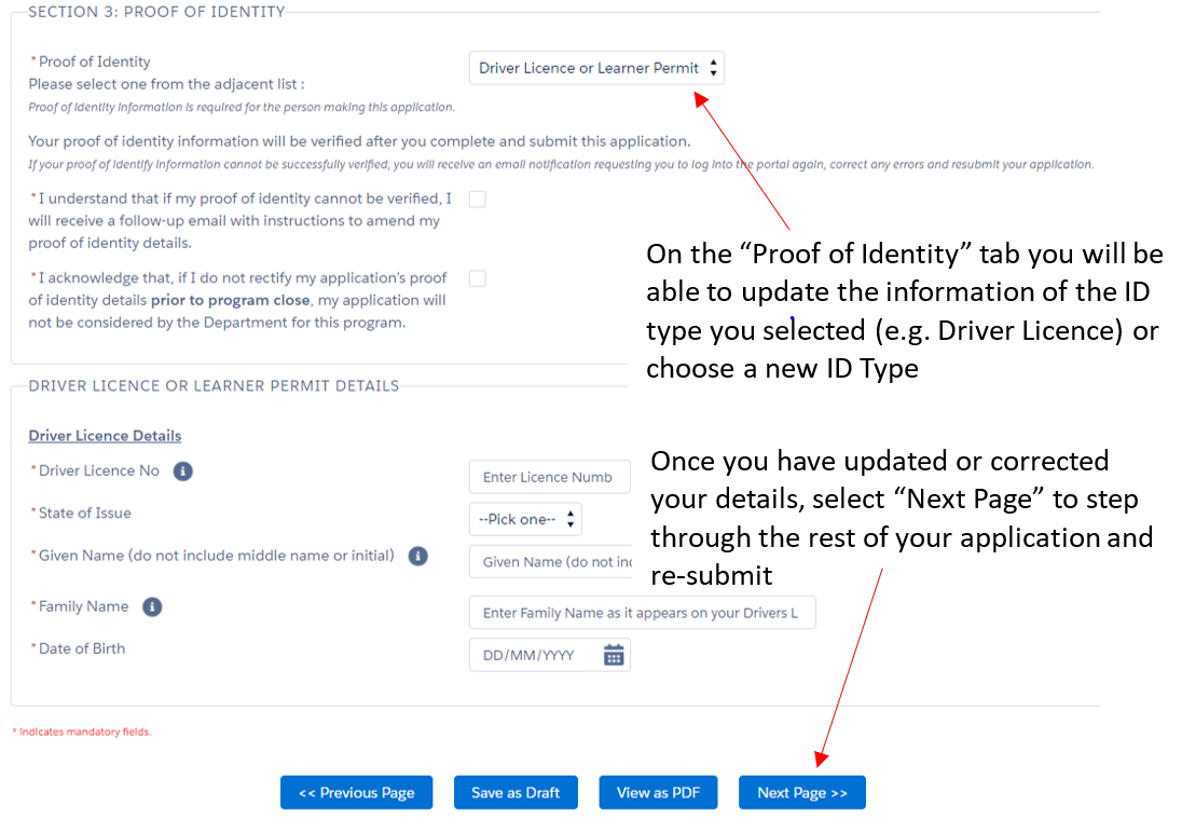
Step Five: Update your Proof of Identity & Resubmit

On the ‘Proof of Identity’ tab you will be able to update the information of the ID type you selected (for example, Driver Licence) or choose a new ID type.

Once you have updated or corrected your details, select ‘Next Page’ to step through the rest of your application and resubmit.

Image shows Proof of Identity page. An arrow points to a drop-down list labelled “Proof of Identity of the Applicant”, with accompanying text that reads, “On the “Proof of Identity” tab you will be able to update the information of the ID type you selected or choose a new ID Type.” A second arrow points to a box that reads, “Next Page”, with accompanying text that reads “Once you have updated or corrected your details, select “Next Page” to step through the rest of your application and re-submit”.

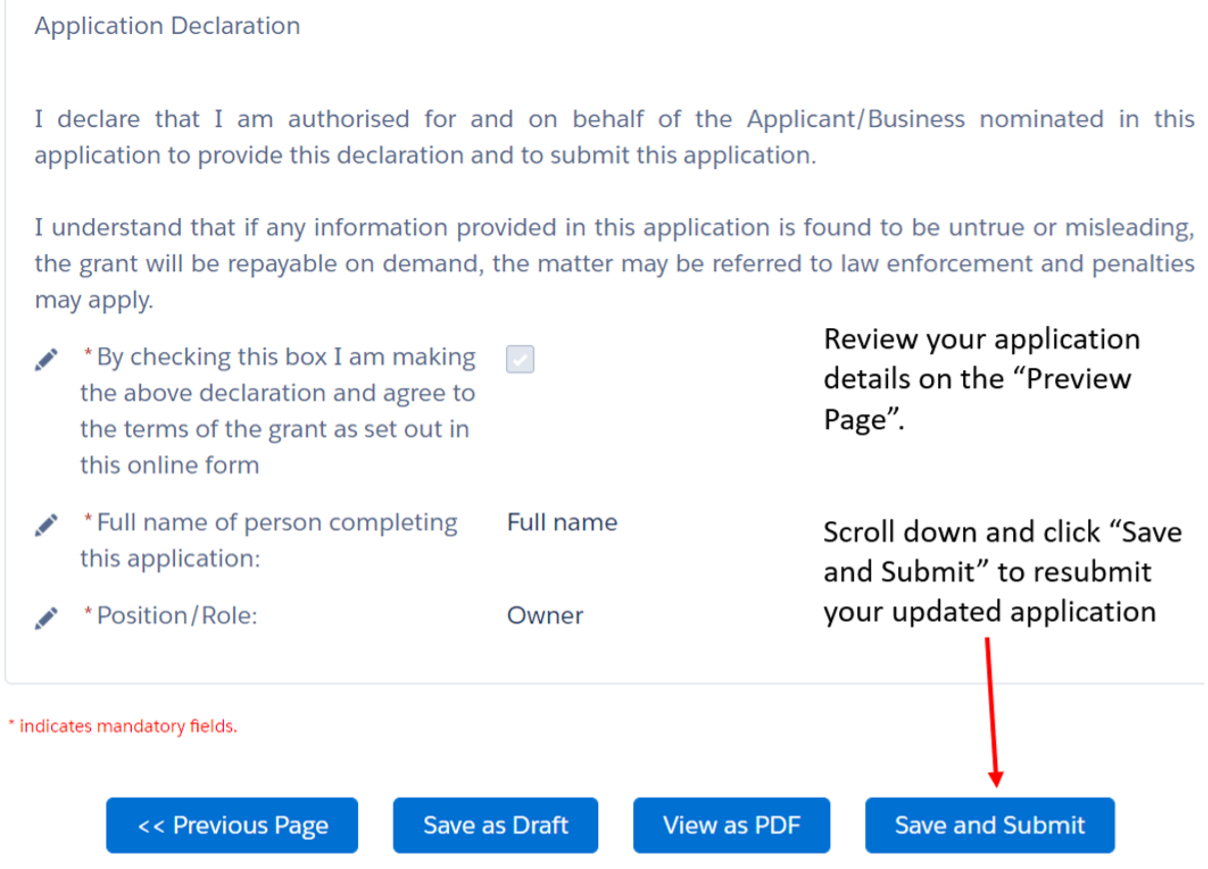
Step Six: Resubmission

Review your application details on Preview page, then scroll down and click ‘Save and Submit’ to resubmit your updated application.

Image shows the Preview page from the application form. A red arrow points to a blue navigation box that reads, “Save and Submit”. The text accompanying the red arrow reads, “Review your application details on the “Preview Page”. Scroll down and click “Save and Submit” to resubmit your updated application”.

Final Step: Submission Confirmation

Image shows Submission Received page that will be show on screen once application and updated details have been submitted. The text reads, “Thank you for your submittal. Your response ID for future reference is listed. We highly recommend that you print out a PDF version of your form response for your records. Click here to view the PDF of your response”.

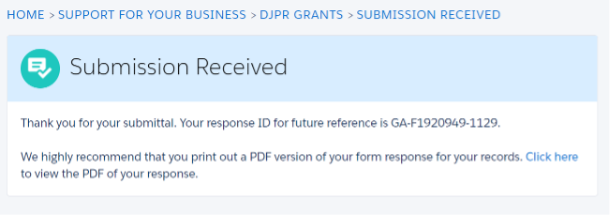
Once you reach this “Submission Received” page, your application and corrected details have been submitted and received.

If these details are still incorrect and your identity document cannot be verified, you will receive another email and you may need to repeat this process.

If you need further support, please call Business Victoria on 13 22 15 or email info@business.vic.gov.au.